Breaking Change:
- The package and CLI have been renamed from
mlx-servertomlx-openai-serverfor PyPI compatibility and uniqueness.- Please update your usage and scripts accordingly.
This repository hosts a high-performance API server that provides OpenAI-compatible endpoints for MLX models. Developed using Python and powered by the FastAPI framework, it provides an efficient, scalable, and user-friendly solution for running MLX-based vision and language models locally with an OpenAI-compatible interface.
Note: This project currently supports MacOS with M-series chips only as it specifically leverages MLX, Apple's framework optimized for Apple Silicon.
- Key Features
- Quickstart
- Demo
- OpenAI Compatibility
- Supported Model Types
- Installation
- Usage
- Request Queue System
- API Response Schemas
- Example Notebooks
- Large models
- Contributing
- License
- Support
- Acknowledgments
- FAQ
- 🚀 Fast, local OpenAI-compatible API for MLX models
- 🖼️ Vision-language and text-only model support
- 🔌 Drop-in replacement for OpenAI API in your apps
- 📈 Performance and queue monitoring endpoints
- 🧑💻 Easy Python and CLI usage
- 🛡️ Robust error handling and request management
- Install (Python 3.11+, Mac M-series):
python3 -m venv oai-compat-server source oai-compat-server/bin/activate pip install git+https://github.com/cubist38/mlx-openai-server.git - Run the server (replace
<path-to-mlx-model>):python -m app.main --model-path <path-to-mlx-model> --model-type lm
- Test with OpenAI client:
import openai
client = openai.OpenAI(base_url="http://localhost:8000/v1", api_key="not-needed")
response = client.chat.completions.create(
    model="local-model",
    messages=[{"role": "user", "content": "Hello!"}]
)
print(response.choices[0].message.content)
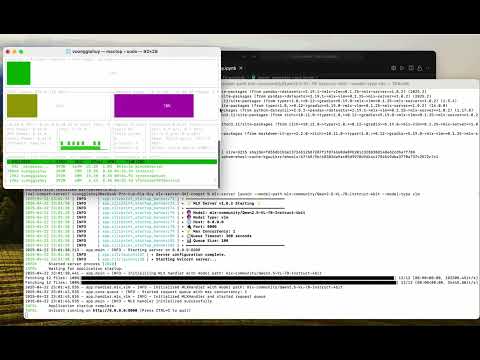
Check out our video demonstration to see the server in action! The demo showcases:
- Setting up and launching the server
- Using the OpenAI Python SDK for seamless integration
This server implements the OpenAI API interface, allowing you to use it as a drop-in replacement for OpenAI's services in your applications. It supports:
- Chat completions (both streaming and non-streaming)
- Vision-language model interactions
- Embeddings generation
- Function calling and tool use
- Standard OpenAI request/response formats
- Common OpenAI parameters (temperature, top_p, etc.)
The server supports two types of MLX models:
- Text-only models (
--model-type lm) - Uses themlx-lmlibrary for pure language models - Vision-language models (
--model-type vlm) - Uses themlx-vlmlibrary for multimodal models that can process both text and images
Follow these steps to set up the MLX-powered server:
- MacOS with Apple Silicon (M-series) chip
- Python 3.11 or later (native ARM version)
- pip package manager
-
Create a virtual environment for the project:
python3 -m venv oai-compat-server
-
Activate the virtual environment:
source oai-compat-server/bin/activate -
Install the package:
# Option 1: Install from PyPI
pip install mlx-openai-server

# Option 2: Install directly from GitHub
pip install git+https://github.com/cubist38/mlx-openai-server.git

# Option 3: Clone and install in development mode
git clone https://github.com/cubist38/mlx-openai-server.git
cd mlx-openai-server
pip install -e .
Issue: My OS and Python versions meet the requirements, but pip cannot find a matching distribution.
Cause: You might be using a non-native Python version. Run the following command to check:
python -c "import platform; print(platform.processor())"If the output is i386 (on an M-series machine), you are using a non-native Python. Switch to a native Python version. A good approach is to use Conda.
To start the MLX server, activate the virtual environment and run the main application file:
source oai-compat-server/bin/activate
python -m app.main \
  --model-path <path-to-mlx-model> \
  --model-type <lm|vlm> \
  --max-concurrency 1 \
  --queue-timeout 300 \
--queue-size 100--model-path: Path to the MLX model directory (local path or Hugging Face model repository)--model-type: Type of model to run (lmfor text-only models,vlmfor vision-language models). Default:lm--max-concurrency: Maximum number of concurrent requests (default: 1)--queue-timeout: Request timeout in seconds (default: 300)--queue-size: Maximum queue size for pending requests (default: 100)--port: Port to run the server on (default: 8000)--host: Host to run the server on (default: 0.0.0.0)
Text-only model:
python -m app.main \
  --model-path mlx-community/gemma-3-4b-it-4bit \
  --model-type lm \
  --max-concurrency 1 \
  --queue-timeout 300 \
  --queue-size 100
Note: Text embeddings via the
/v1/embeddingsendpoint are now available with both text-only models (--model-type lm) and vision-language models (--model-type vlm).
Vision-language model:
python -m app.main \
  --model-path mlx-community/llava-phi-3-vision-4bit \
  --model-type vlm \
  --max-concurrency 1 \
  --queue-timeout 300 \
  --queue-size 100
CLI commands:
mlx-openai-server --version
mlx-openai-server --help
mlx-openai-server launch --help
To launch the server:
mlx-openai-server launch --model-path <path-to-mlx-model> --model-type <lm|vlm> --port 8000The server provides OpenAI-compatible endpoints that you can use with standard OpenAI client libraries. Here are some examples:
import openai

client = openai.OpenAI(
    base_url="http://localhost:8000/v1",
    api_key="not-needed"  # API key is not required for local server
)

response = client.chat.completions.create(
    model="local-model",  # Model name doesn't matter for local server
    messages=[
        {"role": "user", "content": "What is the capital of France?"}
    ],
    temperature=0.7
)
print(response.choices[0].message.content)import openai
import base64
client = openai.OpenAI(
base_url="http://localhost:8000/v1",
api_key="not-needed"
)
# Load and encode image
with open("image.jpg", "rb") as image_file:
base64_image = base64.b64encode(image_file.read()).decode('utf-8')
response = client.chat.completions.create(
model="local-vlm", # Model name doesn't matter for local server
messages=[
{
"role": "user",
"content": [
{"type": "text", "text": "What's in this image?"},
{
"type": "image_url",
"image_url": {
"url": f"data:image/jpeg;base64,{base64_image}"
}
}
]
}
]
)
print(response.choices[0].message.content)import openai
client = openai.OpenAI(
base_url="http://localhost:8000/v1",
api_key="not-needed"
)
# Define the messages and tools
messages = [
{
"role": "user",
"content": "What is the weather in Tokyo?"
}
]
tools = [
{
"type": "function",
"function": {
"name": "get_weather",
"description": "Get the weather in a given city",
"parameters": {
"type": "object",
"properties": {
"city": {"type": "string", "description": "The city to get the weather for"}
}
}
}
}
]
# Make the API call
completion = client.chat.completions.create(
model="local-model",
messages=messages,
tools=tools,
tool_choice="auto"
)
# Handle the tool call response
if completion.choices[0].message.tool_calls:
tool_call = completion.choices[0].message.tool_calls[0]
print(f"Function called: {tool_call.function.name}")
print(f"Arguments: {tool_call.function.arguments}")
# Process the tool call - typically you would call your actual function here
# For this example, we'll just hardcode a weather response
weather_info = {"temperature": "22°C", "conditions": "Sunny", "humidity": "65%"}
# Add the tool call and function response to the conversation
messages.append(completion.choices[0].message)
messages.append({
"role": "tool",
"tool_call_id": tool_call.id,
"name": tool_call.function.name,
"content": str(weather_info)
})
# Continue the conversation with the function result
final_response = client.chat.completions.create(
model="local-model",
messages=messages
)
print("\nFinal response:")
print(final_response.choices[0].message.content)- Text-only model embeddings:
import openai

client = openai.OpenAI(
    base_url="http://localhost:8000/v1",
    api_key="not-needed"
)

# Generate embeddings for a single text
embedding_response = client.embeddings.create(
    model="mlx-community/DeepSeek-R1-Distill-Qwen-1.5B-MLX-Q8",
    input=["The quick brown fox jumps over the lazy dog"]
)
print(f"Embedding dimension: {len(embedding_response.data[0].embedding)}")

# Generate embeddings for multiple texts
batch_response = client.embeddings.create(
    model="mlx-community/DeepSeek-R1-Distill-Qwen-1.5B-MLX-Q8",
    input=[
        "Machine learning algorithms improve with more data",
        "Natural language processing helps computers understand human language",
        "Computer vision allows machines to interpret visual information"
    ]
)
print(f"Number of embeddings: {len(batch_response.data)}")- Vision-language model embeddings:
import openai
import base64
from PIL import Image
from io import BytesIO

client = openai.OpenAI(
    base_url="http://localhost:8000/v1",
    api_key="not-needed"
)

# Helper function to encode images as base64
def image_to_base64(image_path):
    image = Image.open(image_path)
    buffer = BytesIO()
    image.save(buffer, format="PNG")
    buffer.seek(0)
    image_data = buffer.getvalue()
    image_base64 = base64.b64encode(image_data).decode('utf-8')
    return f"data:image/png;base64,{image_base64}"

# Encode the image
image_uri = image_to_base64("images/attention.png")

# Generate embeddings for text+image
vision_embedding = client.embeddings.create(
    model="mlx-community/Qwen2.5-VL-3B-Instruct-4bit",
    input=["Describe the image in detail"],
    extra_body={"image_url": image_uri}
)
print(f"Vision embedding dimension: {len(vision_embedding.data[0].embedding)}")
Note: Replace the model name and image path as needed. The
extra_bodyparameter is used to pass the image data URI to the API.
Warning: Make sure you're running the server with
--model-type vlmwhen making vision requests. If you send a vision request to a server running with--model-type lm(text-only model), you'll receive a 400 error with a message that vision requests are not supported with text-only models.
The server implements a robust request queue system to manage and optimize MLX model inference requests. This system ensures efficient resource utilization and fair request processing.
- Concurrency Control: Limits the number of simultaneous model inferences to prevent resource exhaustion
- Request Queuing: Implements a fair, first-come-first-served queue for pending requests
- Timeout Management: Automatically handles requests that exceed the configured timeout
- Real-time Monitoring: Provides endpoints to monitor queue status and performance metrics
The queue system consists of two main components:
-
RequestQueue: An asynchronous queue implementation that:
- Manages pending requests with configurable queue size
- Controls concurrent execution using semaphores
- Handles timeouts and errors gracefully
- Provides real-time queue statistics
-
Model Handlers: Specialized handlers for different model types:
MLXLMHandler: Manages text-only model requestsMLXVLMHandler: Manages vision-language model requests
Monitor queue statistics using the /v1/queue/stats endpoint:
curl http://localhost:8000/v1/queue/statsExample response:
{
  "status": "ok",
  "queue_stats": {
    "running": true,
    "queue_size": 3,
    "max_queue_size": 100,
    "active_requests": 5,
    "max_concurrency": 2
  }
}The queue system handles various error conditions:
- Queue Full (429): When the queue reaches its maximum size
{
  "detail": "Too many requests. Service is at capacity."
}- Request Timeout: When a request exceeds the configured timeout
{
  "detail": "Request processing timed out after 300 seconds"
}- Model Errors: When the model encounters an error during inference
{
  "detail": "Failed to generate response: <error message>"
}The server supports streaming responses with proper chunk formatting:
{
    "id": "chatcmpl-1234567890",
    "object": "chat.completion.chunk",
    "created": 1234567890,
    "model": "local-model",
    "choices": [{
        "index": 0,
        "delta": {"content": "chunk of text"},
        "finish_reason": null
    }]
}The server implements OpenAI-compatible API response schemas to ensure seamless integration with existing applications. Below are the key response formats:
{
  "id": "chatcmpl-123456789",
  "object": "chat.completion",
  "created": 1677858242,
  "model": "local-model",
  "choices": [
    {
      "index": 0,
      "message": {
        "role": "assistant",
        "content": "This is the response content from the model."
      },
      "finish_reason": "stop"
    }
  ],
  "usage": {
    "prompt_tokens": 10,
    "completion_tokens": 20,
    "total_tokens": 30
  }
}{
"object": "list",
"data": [
{
"object": "embedding",
"embedding": [0.001, 0.002, ..., 0.999],
"index": 0
}
],
"model": "local-model",
"usage": {
"prompt_tokens": 8,
"total_tokens": 8
}
}{
"id": "chatcmpl-123456789",
"object": "chat.completion",
"created": 1677858242,
"model": "local-model",
"choices": [
{
"index": 0,
"message": {
"role": "assistant",
"content": null,
"tool_calls": [
{
"id": "call_abc123",
"type": "function",
"function": {
"name": "get_weather",
"arguments": "{\"city\":\"Tokyo\"}"
}
}
]
},
"finish_reason": "tool_calls"
}
],
"usage": {
"prompt_tokens": 15,
"completion_tokens": 25,
"total_tokens": 40
}
}{
"error": {
"message": "Error message describing what went wrong",
"type": "invalid_request_error",
"param": null,
"code": null
}
}The repository includes example notebooks to help you get started with different aspects of the API:
-
function_calling_examples.ipynb: A practical guide to implementing and using function calling with local models, including:
- Setting up function definitions
- Making function calling requests
- Handling function call responses
- Working with streaming function calls
- Building multi-turn conversations with tool use
-
vision_examples.ipynb: A comprehensive guide to using the vision capabilities of the API, including:
- Processing image inputs in various formats
- Vision analysis and object detection
- Multi-turn conversations with images
- Using vision models for detailed image description and analysis
-
lm_embeddings_examples.ipynb: A comprehensive guide to using the embeddings API for text-only models, including:
- Generating embeddings for single and batch inputs
- Computing semantic similarity between texts
- Building a simple vector-based search system
- Comparing semantic relationships between concepts
-
vlm_embeddings_examples.ipynb: A detailed guide to working with Vision-Language Model embeddings, including:
- Generating embeddings for images with text prompts
- Creating text-only embeddings with VLMs
- Calculating similarity between text and image representations
- Understanding the shared embedding space of multimodal models
- Practical applications of VLM embeddings
-
simple_rag_demo.ipynb: A practical guide to building a lightweight Retrieval-Augmented Generation (RAG) pipeline over PDF documents using local MLX Server, including:
- Reading and chunking PDF documents
- Generating text embeddings via MLX Server
- Creating a simple vector store for retrieval
- Performing question answering based on relevant chunks
- End-to-end demonstration of document QA using Qwen3 local model

When using models that are large relative to your system's available RAM, performance may suffer. mlx-lm tries to improve speed by wiring the memory used by the model and its cache—this optimization is only available on macOS 15.0 or newer. If you see the following warning message:
[WARNING] Generating with a model that requires ... it means the model may run slowly on your machine. If the model fits in RAM, you can often improve performance by raising the system's wired memory limit. To do this, run:
bash configure_mlx.shWe welcome contributions to improve this project! Here's how you can contribute:
- Fork the repository to your GitHub account.
- Create a new branch for your feature or bug fix:
git checkout -b feature-name
- Commit your changes with clear and concise messages:
git commit -m "Add feature-name" - Push your branch to your forked repository:
git push origin feature-name
- Open a pull request to the main repository for review.
This project is licensed under the MIT License. You are free to use, modify, and distribute it under the terms of the license.
If you encounter any issues or have questions, please:
- Open an issue in the repository.
- Contact the maintainers via the provided contact information.
Stay tuned for updates and enhancements!
We extend our heartfelt gratitude to the following individuals and organizations whose contributions have been instrumental in making this project possible:
- MLX team for developing the groundbreaking MLX framework, which provides the foundation for efficient machine learning on Apple Silicon
- mlx-lm for efficient large language models support
- mlx-vlm for pioneering multimodal model support within the MLX ecosystem
- mlx-community for curating and maintaining a diverse collection of high-quality MLX models
We deeply appreciate the broader open-source community for their invaluable contributions. Your dedication to:
- Innovation in machine learning and AI
- Collaborative development practices
- Knowledge sharing and documentation
- Continuous improvement of tools and frameworks
Your collective efforts continue to drive progress and make projects like this possible. We are proud to be part of this vibrant ecosystem.
A special acknowledgment to all contributors, users, and supporters who have helped shape this project through their feedback, bug reports, and suggestions. Your engagement helps make this project better for everyone.