- This is an ficticious photographer website to showcase a project using the Django Framework. This is the last project completing Code Institute course.

-
-
- As a First Time Visitor, I want to easily understand the main purpose of the site and learn more about the studio.
- As a First Time Visitor, I want to be able to easily navigate throughout the site to find examples of previous work.
- As a First Time Visitor, I want to look for testimonials to understand what their clients think of them and see if they are trusted. I also want to locate their social media links to see their followings on social media to determine how trusted and known they are.
- As a First Time Visitor, I want to be able to book a photoshoot session and understand how it works.
- I want to register an account, easily login or logout, receive a confirmation email after registering and have a personalized user profile.
-
- As a Returning Visitor, I want to check my past purchases.
- As a Returning Visitor, I want to find community links.
- As a Returning Visitor, I want to be able to order the photo sessions by price or by name.
-
- As a Frequent User, I want to check to see if there are any newly added photo sessions.
- As a Frequent User, I want to update my details on my profile.
- As a Frequent User, I want to get in touch with the Studio.
-
-
-
- This Webapp with a simple language keeping the navbar menu on top when on desktop and on mobile activated by a hamburguer button style making the navigation very easy and accessible from anywhere. The Menu is dynamic showing only allowed options to regular or superuser (admin) users. The admin has the power to create Projects and assign to users. Also the admin can reset any user's password if necessary or modify the user to be another admin. After logged in the user is presented with the Dashboard that will list all projects and its related tickets.
-
- The blue colour was chosen as the main tone as it is known to be a calming colour. The contrast ratio was taken in consideration to every person be able to read clearly.
-
- The Roboto font is the default font used throughout the whole website with Sans Serif as the fallback font in case the font isn't being imported into the site correctly. Roboto is a clean font used frequently in Google ecosystem, so it is both attractive, appropriate and memorable.
-
-
Responsive on all device sizes
-
Interactive elements
-
Parallax Effect on main page and Nabar.
-
AllAuth secure Login, User Registration with email confirmation.
-
Stripe Payments.
-
-
- The Database was laid with tables to reflect the need of the app at initial structure. It was taken in consideration that tables should be simple and data must be easy to retrieve and if necessary to expand for future improvements.
DB diagram created with DbDiagram.io -
DbDiagram.io Diagram - View
-

- Django
- Django Framework was used through the entire webapp to integrate the back-end with the front-end.
- Bootstrap 4.3.1
- Bootstrap was used to assist with the responsiveness and styling of the website.
- Google Fonts
- Google fonts were used to import the 'Roboto' font into the style.css file which is used on all pages throughout the project.
- Font Awesome
- Font Awesome was used on all pages throughout the website to add icons for aesthetic and UX purposes.
- jQuery
- jQuery came with Bootstrap to make the navbar responsive but was also used to create the Parallax effect function and other JavaScript functions through the site.
- Git
- Git was used for version control by utilizing the Gitpod terminal to commit to Git and Push to GitHub.
- GitHub
- GitHub is used to store the projects code after being pushed from Git.
- Affinity Photo
- Photoshop was used to create the logo, resizing images and editing photos for the website.
- Affinity Designer
- Affinity Designer was used to create the wireframe/mokup during the design process.
- Db Diagram io
- Created the Database Schema with this very handy DB tool vizualization website.
- SQLite
- SQL Database delivered together with Django Framework used in the development phase.
- PostgreSQL
- SQL Database used by the application setup at ElephantSQL.com.
- Render
- Render was used to deploy the project and have the app live.
- AWS
- Cloud Bucket used to keep static files and media of the website.
- Visual Studio Code
- Visual Studio Code was used to write the code.
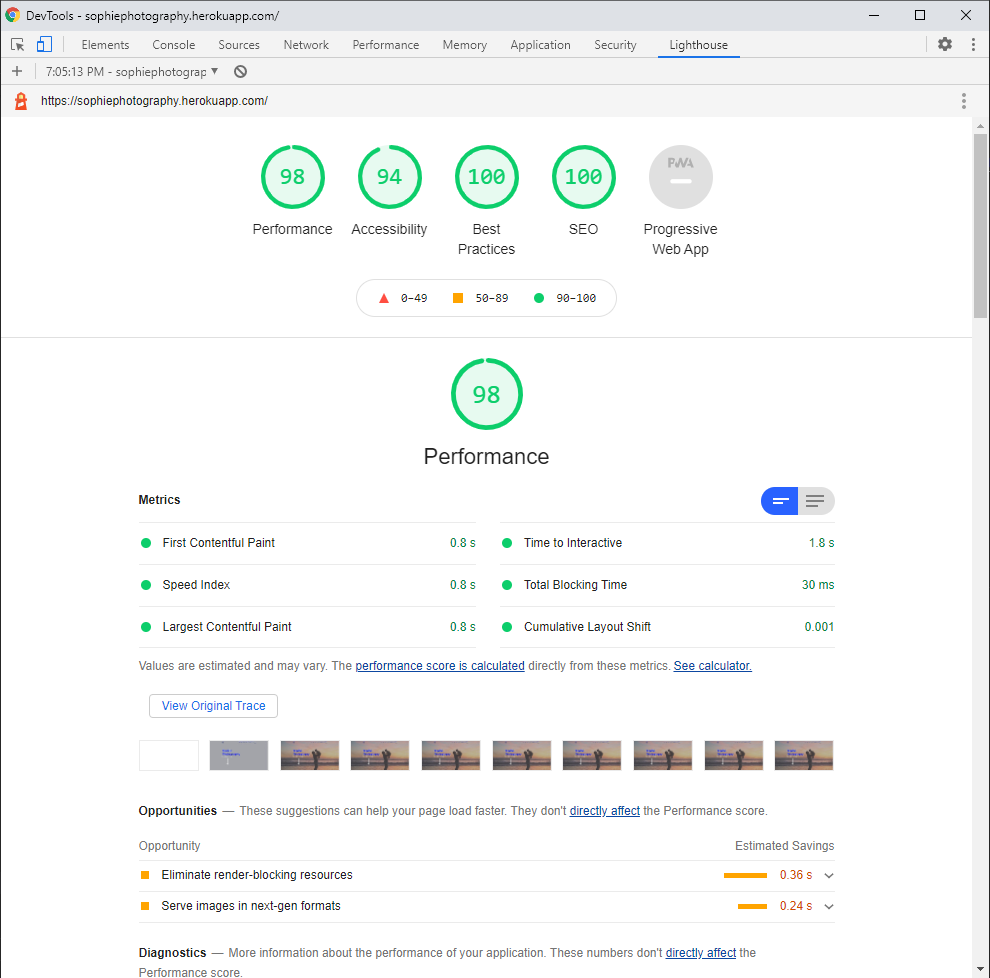
The W3C Markup Validator and W3C CSS Validator Services were used to validate the page of the project to ensure there were no syntax errors.
-
- Run the HTML validator and made the necessary corrections accordingly to the validator. The changes can be seen on my wrapping up commits of the project.
-
- Run the CSS Validator and made corrections that can be seen on Github on my latest commits wrapping up the project.
-
- No errors were reported to the JS scripts for the webapp.
-
- It was pointed out security flaw using an older version of JQuery, score improved after update.
- It was pointed out to use rel="noopener" on links to external websites for security, score improved after including it.
-
- All warnings and lines out of PEP8 Style were corrected.
- Still showing errors related to the import of checkout.signals and settings.py import env to check environment variables, but I can't remove these as they are important to the application to run.
-
- As a First Time Visitor, I want to easily understand the main purpose of the site and learn more about the studio.
- Landing on the main hero page it has a call to scroll the page and the first section is talking about the Studio.
- As a First Time Visitor, I want to be able to easily navigate throughout the site to find examples of previous work.
- All Sessions contain a produced photography to show how the work is when completed.
- As a First Time Visitor, I want to look for testimonials to understand what their clients think of them and see if they are trusted. I also want to locate their social media links to see their followings on social media to determine how trusted and known they are.
- The page shows testimonials and links to social media accounts where the customer can see the engagement with its followers as also more pictures of past works.
- As a First Time Visitor, I want to be able to book a photoshoot session and understand how it works.
- All sessions has an explanation of what is going to be purchased, how many hours, location of photoshooting and extras.
- I want to register an account, easily login or logout, receive a confirmation email after registering and have a personalized user profile.
- The webapp allows users to register, update the profile and also keep track of sessions purchased.
- A confirmation email is sent to the user when creating a user profile, reseting password as other user related actions. Also an email is sent when purchase is successful.
- As a First Time Visitor, I want to easily understand the main purpose of the site and learn more about the studio.
-
- As a Returning Visitor, I want to check my past purchases.
- When logged in, the user can check the past purchases on their profile page.
- As a Returning Visitor, I want to find community links.
- Community links are on the footer of the main page and easily found.
- As a Returning Visitor, I want to be able to order the photo sessions by price or by name.
- An order button is available when on the products page and they can be reordered acordingly with the options available.
- As a Returning Visitor, I want to check my past purchases.
-
- As a Frequent User, I want to check to see if there are any newly added photo sessions.
- The user can return anytime to the site and check new added sessions on the Product pages as also on social media.
- As a Frequent User, I want to update my details on my profile.
- User can update their information at any time using the My Profile link at the Navbar.
- As a Frequent User, I want to get in touch with the Studio.
- Users can contact the Studio using the Contact Us form for any questions or Booking of sessions.
- As a Frequent User, I want to check to see if there are any newly added photo sessions.
- The Website was tested on Google Chrome, Microsoft Edge, Internet Explorer, Firefox and Safari browsers.
- The website was viewed on a variety of devices such as Desktop, Laptop, Android and iPhones.
- A large amount of testing was done to ensure that all pages were linking correctly.
- Friends and family members were asked to review the site and documentation to point out any bugs and/or user experience issues.
- On Iphone devices, the buttons of quantity doesn't display correctly making them not proportional to the size of the form.
- Also on Iphone devices, the main page background image is showing bigger than it should be, but it is not causing usability problems.
- On all devices when cheking out, the spinner shows up and the footer jumps to the middle of the screen.
- On Internet Explorer the parallax effect doesn't work and cards also show with a humongous height, buttons update and delete at the trolley don't work and pictures are not shown in the correct size.
- The footer doesn't stay on the bottom on some pages, eg. if you make a search that doen't return any product, the footer will go up as the page reduces the size.
The project was deployed to Render, ElephantSQL and AWS, and the code is at Github. To be able to deploy at anyones machine, you can do using the following steps...
By forking the GitHub Repository we make a copy of the original repository on our GitHub account to view and/or make changes without affecting the original repository by using the following steps...
- Log in to GitHub and locate the GitHub Repository
- At the top of the Repository (not top of page) just above the "Settings" Button on the menu, locate the "Fork" Button.
- You should now have a copy of the original repository in your GitHub account.
- Log in to GitHub and locate the GitHub Repository
- Under the repository name, click "Clone or download".
- To clone the repository using HTTPS, under "Clone with HTTPS", copy the link.
- Open Git Bash
- Change the current working directory to the location where you want the cloned directory to be made.
- Type
git clone, and then paste the URL you copied in Step 3.
$ git clone https://github.com/YOUR-USERNAME/YOUR-REPOSITORY
- Press Enter. Your local clone will be created.
$ git clone https://github.com/YOUR-USERNAME/YOUR-REPOSITORY
> Cloning into `CI-Clone`...
> remote: Counting objects: 10, done.
> remote: Compressing objects: 100% (8/8), done.
> remove: Total 10 (delta 1), reused 10 (delta 1)
> Unpacking objects: 100% (10/10), done.
Click Here to retrieve pictures for some of the buttons and more detailed explanations of the above process.
- If you are running the project in your computer, you will need to create a env.py file on the root folder and include all environment variables following this exemple:
- At settings.py it is possible to identify the environment variables checking which ones are receiving os.environ.get:
DEFAULT_FROM_EMAIL = os.environ.get('DEFAULT_FROM_EMAIL')
- Inside the env.py file, the variables should be setup in this way:
import os
os.environ.setdefault("SECRET_KEY", "SECRET_KEY_VALUE_HERE")
os.environ.setdefault("DEVELOPMENT", "TRUE")
etc...
-
If you are running the app locally, your static files can be at your machine and the environment setting USE_AWS sould be set FALSE or Commented out. But if you are deploying on Render, you should create an AWS account and a public bucket on S3 to hold your files. If you prefer your static files can also be stored in another Cloud Service. If you are choosing AWS, follow the next STEPS, just make sure to give Read permissions to your files so Render can read the files from AWS.
- Just remember if using another service, the Environment Variables will be accordingly with the other provider.
-
With the enviroment setup, run the dependencies installation:
$ pip install -r requirements.txt
or
$ pip3 install -r requirements.txt
- Run migrations:
$ python manage.py migrate
or
$ python3 manage.py migrate
- Create a superuser for your Database:
$ python manage.py createsuperuser
or
$ python3 manage.py createsuperuser
- At this point the project should be read to run if doing locally:
$ python manage.py runserver
or
$ python3 manage.py renserver
-
Code Institute - This project was based on Boutique Ado from Code Institute that can be found at Chris' Github Repository.
-
Bootstrap 4 - The documentation part was important to understand and use the forms and components of the Framework.
-
Kevin Powell Youtube - It was important to understand how Parallax work so I could built the same effect on my main page and also on the Navbar to change oppacity as the page scroll down.
-
Design Course Youtube - This video also gave me some insites to use on the website and helped me to create the arrow on the landing page.
-
Unsplash.com and the photographers that made the pictures available royalty free for use, here they are:
-
Pexels and the videographer that made available the video used on the main page of the website.
-
Other Sources - Not less important, but also helpful, Stack Overflow, W3 Schools, Google Search and Python/Django documentation.
-
Tutor Support from Code Institute in special Jo Wings that shared her time to help me to solve few bugs I run into during the development process.
-
My Mentor Gerry for continuous helpful feedback.
-
All friends and family that helped me to test and gave me valuable feedback.